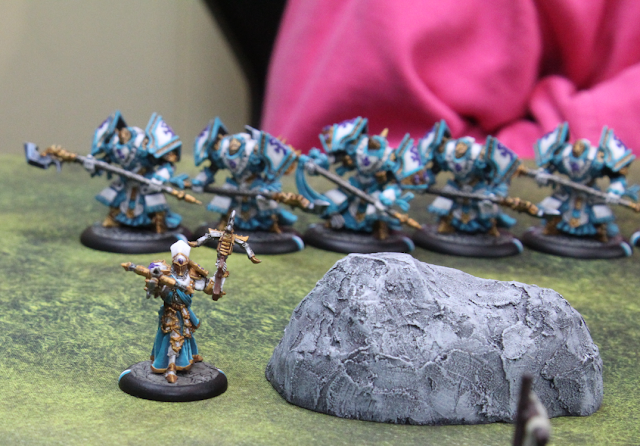
Crafting terrain: Making a large boulder (obstruction)
I like to do something hobby oriented almost every day. Sometimes that means painting a model from start to finish. Sometimes that means just replacing the parchment paper on my wet palette so it's ready the next day.
On days when I don't have much time or maybe didn't get much sleep, I prefer not to focus on painting a model or using a sharp blade to clean up mold lines on a new build. Often, I'll use those days to make terrain. Making things like boulders, stone walls, trees, etc gives a lot of latitude, because things are not perfectly symmetrical in nature. So, it doesn't matter if something isn't perfectly square or flat. In fact, it makes it look better to have all those little imperfections; especially when you're making rocks / boulders.
The materials / tools I used were:
Rigid foam insulation scraps
Spackling
Hot wire cutter / Hobby knife
Low-temp hot glue gun & hot glue sticks
Small plastic glue spreader
Sand paper
ModPodge
Acrylic paint
Building the basic shape
I went through my scrap foam to find some random shapes. I put the larger pieces on the bottom & progressed up in 3 layers with slightly smaller bits. I learned the hard way that using regular hot glue will melt right through the foam. Thankfully, low-temp hot glue works perfectly.
I took advantage of the odd shapes of the offcut scraps to get a more imperfect overall shape. I sketched out a rough idea of the shape on the top with one end being thicker than the other.

Using a handheld hot wire foam cutter, I roughed out the cut. My handheld cutter is a pretty cheap one and it's hard to control the cut to keep it straight. This led to some areas being a bit more jagged than I wanted. I used a utility knife to clean these up and cut a few of the harsher jagged edges down.

Any time I'm making anything that's going to be rock / cement / etc, I like to use spackling to give it a roughish texture. It also allows me to smooth over some of the sharper edges that are still there that I didn't want to completely remove with the knife; or else the size of the boulder would be cut too small.
Foam insulation is very smooth. That makes getting the spackling to stick difficult. I used 100grit sandpaper to rough up the entire surface just a bit to give it some "bite" for the spackling to stick to. Unfortunately, I didn't think to take a pic of this step until I was pretty far along with the spackling, but you can see a little of the roughed up / sanded area of the foam at the bottom right above my thumb in the pic below.

After I spread the spackling around, I let it sit for an hour or so to set up completely. I didn't cover the entire surface of the foam with it, but rather spread it around with some areas thicker and others just a very thin layer just to give the foam a bit of a rougher texture.
After the spackling hardened, I lightly brushed the same 100grit sandpaper around the entire surface, just to knock off any of the small clumps that were on the surface. I didn't want to smooth it out, but just take off any little bits that were just barely hanging on but not actually adhered to the surface. This happens because I tend to put a little more spackling in some areas to make sure that enough of it takes a hold to the foam.

I recently learned how to use a mix of ModPodge & cheap acrylic black craft paint as a protective coating for the things I make out of foam. ModPodge has resin in it that gives a little bit of support / stiffness & the black paint helps to define the detail easier to your eye. I let that dry overnight. I'm not sure if that long was needed, but since it's been cold here & I'm new to ModPodge, I figured better safe than sorry. The next day, I primed it with black Stynylrez.

Growing up in poverty, I am always looking for ways to recycle things, stretch things out, and just all around make the most of whatever resources I'm working with. One thing I like to do keeping with that mindset is to use up the last little bits of paint left on my wet palette paper when the time comes to replace it.
I spray a bit of water on the middle of the paper and then mix up thin glazes / filters of the different colors and randomly paint them onto the piece. I primarily use this for painting things are either rock / stone or undead flesh like Cryxian zombies.
Not only does this make use of that last little bit of paint left over from whatever I'd painted before, but it also gives some nice subtle underlying colors for when I start glazing & dry brushing various grays over the top. I paint these random colors on as glazes or stipple it in to give a visual texture. These random colors peaking out under the grays give a more realistic feel to the final piece; almost as if from minerals staining the rock over centuries.

After the random colors are dried, I dry brush on a dark gray. I try to cover a fair amount of the surface, leaving just a bit of the original random colors uncovered; preferring more to have them be faint tones peaking through the thin dry brush layer. Once that's dried, I paint the entire surface with a black wash. I'm not very careful with the wash. I just slather it on, letting it pool in crevices and give a dark filter to the exposed areas.
Then, I mix up a mid tone blueish gray and dry brush it all over, making sure to only catch the raised surfaces. I also bounce around a bit randomly and don't touch every side / area with the blue-gray mid tone.

To finish up, I dry brushed it twice more. The first pass was with a light gray and stayed more towards the upper 3/4 of the boulder. The second pass was with a very light gray (almost white) towards the upper 1/2 of the boulder, just hitting the most exposed ridges where the sunlight would catch them. After that dried up, I clear coated it with DullCote through my airbrush.


Comments
Post a Comment