Crafting terrain: Making a wall of hay bales
Last week, I was searching the web for pics of model train sets to get ideas for terrain. Mainly, I was looking for trees to get some ideas of how they might have sculpted / made the foliage. I saw a photo of a rustic model train set that included a farm house with an old truck that had some hay bales in the back.
Immediately, my focus shifted. Those hay bales were so different from anything I'd thought of when I thought "Warmchine terrain". I decided to try to make some to use as hedges / obstacles with concealment. This would be a fun contrast to the stone walls I sculpted a few months back that are obstacles with cover.

The materials / tools I used were:
Rigid foam insulation scraps
Coconut husk fibers
Cotton rope
Craft glue
Low-temp hot glue sticks
Matte acrylic medium
Styrofoam / plastic cups
Large scissors
Hobby knife
Parchment paper
Low-temp hot glue gun
I had a basic idea of how I wanted to make them, but I was pretty much experimenting as I went a long. There are a few things that I realized I could have / should have done differently & I mention those during the process here as I go through it.
Prepping the rope / bindings

After I got abut 5" of the rope unbraided, I cut it. I continued to work it loose until each length of rope consisted of 2 thin strands.
I put those off to the side to work on the foam, because I wouldn't know the final length needed until I had the hay bales pretty much together to measure off of.
Making the basic hay bales
I keep a spare Vassal Mechanik model on my craft desk to use as a gauge when crafting terrain. Using him as a reference for scale, I cut the foam into rectangles with a hobby knife. I tried to keep them all roughly the same size, but didn't stress over it. Also, some of the pieces had gouges / small bits missing from them from when the original foam was being worked in my shop. That wouldn't be an issue since the fibers I was going to glue on would mask any "imperfections" in the foam itself.
After I had the rectangles cut, I rubbed all 6 sides of each one on a small scrap of 100 grit sandpaper. Foam insulation has a REALLY smooth surface. It's important to rough it up a little so that the glue & fibers have a better chance to bond to it.

Foam can react poorly to the chemicals in certain glues (namely super glue) that will melt it on contact. Wanting to avoid that, I went with a white glue, choosing Aleene's tacky craft glue, because dipping the rectangles into the fibers meant I needed a thick glue that wouldn't run off when I turned it upside down.
I laid out a small piece of parchment paper & used the scissors to cut / shred some of the coconut husk fibers into small pieces (1/4" or so long). I bunched them up into a pile on the paper, put some glue on the rectangles, & then pressed them (glue side down) into the fibers. Since the pile of fibers wasn't exactly uniform (not really possible with them being loose), there were a few small areas that were still bare on some of the bales.
I didn't want to risk messing up what was already there. So, I did one press on each rectangle & put them aside as I worked on the next one. By the time I had done 1 pass with all of them, the glue was dry enough that I could dab a little more onto the bare areas & press them again.
Once one side was fully dry, I used a pair of scissors to carefully trim the 4 edges of the fibers to keep each side square before gluing / dipping the next side. If you don't do this, as you glue all *5 sides on, you'll end up with a ball / egg shape instead of a rectangle.
* I didn't glue any fibers onto the bottoms of any of the rectangles. For one thing, I needed them to be able to sit flat on the table in-game. Secondly, it was unnecessary since the fibers on the sides perfectly hide any idea that the bottom was left bare.

This was a point where I realized a few mistakes that I could have avoided. First, cutting these fibers over the parchment paper was a mess no matter how careful or neatly I tried to do it. What I'm going to do in the future is set up a large ziploc bag as a receptacle & cut the fibers above it. This way all the fibers fall neatly into the bag and I have a handy storage solution for whatever is left over / not used in the current project.
Secondly, the parchment paper was a horrible idea. As the pile of fibers got smaller, little bits of glue got onto the paper. When I tried to brush the loose fibers back into a pile a few minutes later, my finger caught a few that had been glued to the paper. The paper bunched up & fibers went everywhere.
I grabbed a Styrofoam cup from my workshop & cut it with a hobby knife so that it was basically a little bowl. Then, I put the loose fibers into it & pressed the rest of the sides into it when gluing them on. This fixed a few problems. For one thing, the pile stayed together, as opposed to how it would gradually spread out thin / dispersed as I'd press them into the parchment paper. Secondly, since the pile stayed together, no glue got to the bottom of the cup to dry up & stick to it.
This is what the mess looked like when first started sweeping up the loose fibers on my desk to put them into the cup. For some dumb reason, I didn't take an "after" pic to show what it looked like. Guessing I just got too caught up into the fun of the build.

Making the bindings
Once I had 3 sides of at least a few bales with the fiber glued on (top & both ends), I was able to get a measurement for the bindings. I should note that I do not use a ruler to measure things when crafting. That is a waste of time & can also be awkward with certain things; like trying to measure around 3 sides of a tiny rectangle.
Instead, what I did was wrap a strand of rope around it and cut it just a tiny bit longer than needed to give me some room to play with. A single strand of the unbraided rope was too thin to stand out. I kept them as 2 strands twisted together. Of course, this twist wouldn't stay tight by itself.
So, I cut a plastic cup the same way I'd cut the Styrofoam cut & then put some acrylic matte medium into it with some water (roughly 50-50 mix). I chose the acrylic medium instead of glue, because I wanted something that would "glue" the strands together (twisting them together again after dipping them into it), but wouldn't be too tacky. I dipped them into the medium with a pair of old tweezers that I use for craft stuff.
This may not have been necessary. I may have been able to just water down the same craft glue a bit more to get the same thing. No clue. Again, I was just trying things out & experimenting. This just seemed like the good idea at the time & it worked well. Also, why did I use a plastic cup instead of a Styrofoam cup for this? Because it happened to be what was nearby. The main thing was that I used different cups for each part of the process.

I set the strands aside after dipping them into the medium. While they dried, I continued to glue / press the rest of the rectangles into the fibers.
After I felt like they were dried enough (didn't have to be perfectly dry, just sort of "set" with the 2 strands bound together), I mixed up some old paint I had (brown & red) into another cut plastic cup "bowl". Then, I dipped them into this to dye the rope & set them aside to dry again.
This pic was when I was first starting to put them into the paint, but I completely submerged them & let them sit in it for at least 5 minutes or so. I didn't time it exactly, but I wanted to make sure the paint had time to soak into the cotton fibers.

Wrapping the bindings
After I had 5 sides of each rectangle covered with fiber & the rope had been removed from the paint / dye long enough to dry, it was time to start putting together the individual hay bales. Just like super glue, hot glue will melt right through rigid foam. Thankfully, you can get inexpensive low-temp (or in my case, multi-temp) hot glue guns & glue sticks. The one I got has 2 temperature settings. The gun cost about $10 and a pack of glue sticks was just a few dollars more.
I put a small dab of hot glue at the bottom of each hay bale near one end & pressed an end of the rope into it. I used my finger to smear the hot glue dab onto the rope end to flatten it out a bit. After it cooled off enough to harden (just a handful of seconds), I used a pair of scissors to trim any dangling bits of the hot glue that were left from smearing the dab flat. Then, I wrapped the rope around the length of the bales over the top & redid the same hot glue process on the other end of the bottom. After the hot glue cooled / hardened, I trimmed any excess rope that was left beyond the hot glue spot.

I was handling the hay bales before some of the glue on the fibers had fully dried. A few corners had bits that fell off. At that point, re-dipping them into the cup of fibers with a dab of glue would have been a nightmare. Instead, I put a small dab of glue onto the bare spot, cut some fibers a little smaller than before, & then applied them to that specific spot with tweezers.
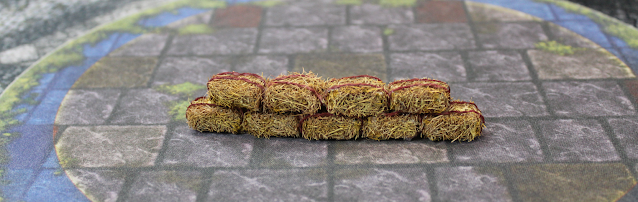
After I got enough of the bales finished, I was excited to start putting them together. Using the same low-temp hot glue, I glued 5 bales into a row. I slightly offset each bale with either a small angle or having it sit slightly forward or back to keep it from looking too uniform or sterile. I then glued 4 bales to the top with the same random offsets.

Once all 9 bales were glued together to make the hedge / wall, I mixed up some paint to make it look more like hay instead of coconut fibers. I used an old brush with some thinned yellow ochre so that I could dab it into any crevices or openings and color the deeper regions. After letting that dry a bit, I dry brushed some of the same yellow ochre onto the outside fibers on the exposed sides & tops. The reason I dry brushed the yellow ochre on instead of just painting all the fibers completely was that I wanted some parts of each fiber to keep the original darker brown color to give shading to them.
I finished the hay up by dry brushing the same outside areas with yellow ochre mixed with white to give it the look of the sun reflecting off of them. Lastly, I used the same paint that I'd dyed the bindings with to carefully brush some on to any areas where the hay dry brushing had colored the rope.


Comments
Post a Comment